
How to Auto-Caption Podcast Clips via API (Pay Per Clip)
Auto-caption a 9-second podcast clip via API for 0.25 credits - not 1.75 for the whole file. Word-level timings, styled captions, one replacement value.

Founder
Word-by-word highlight captions are the default dress code of short-form video - scroll any feed and the clips doing numbers have them burned in. They're also the step that still drags automated clip pipelines back into an editor. Cutting the clip? Scriptable. Rendering it vertical? Scriptable. Captions that land on the right word at the right millisecond, styled like your brand? That's where someone usually opens a timeline by hand.
This tutorial removes that step: you'll auto-caption a podcast clip via API - a vertical highlight with styled, word-synced captions from one call, billed for the 9 seconds you clipped, not the 6-minute file it came from.
Key Takeaways
- One replacement value -
{"transcribe": {"source": "main_clip"}}- fills a template's caption overlay with word-synced captions transcribed from that clip's audio- The clip window is derived from the overlay's trim automatically: a 9-second highlight of a 6:16 recording is transcribed and billed as 9 seconds - 0.25 credits, not 1.75
- Captions inherit the template's designed caption style, word-by-word highlight included; there's no styling JSON to fight
- The standalone endpoint (
POST /api/v1/ai/captions) does the same with explicitstartTime/endTime- files up to 5 GB, audio up to 3 hours
How does auto-captioning via API work?
In Renderly, a caption overlay marked as a template variable accepts a transcribe value in the render request. The engine transcribes the source clip's audio into captions with real word-level timings - 0.25 credits per started minute of transcribed audio - and the template's caption design styles them (AI features guide, 2026).
The phrase that matters there is word-level timings. Most transcription output is line-level: subtitle blocks like an SRT file, where a whole line such as "She's your passion. Be tender to…" sits on screen for nearly three seconds as one unit. That's fine for closed captions. It's useless for the word-by-word highlight style, which needs to know that "your" starts at 2,691 ms and hands off to "passion" at 2,932 ms. Renderly returns a timestamp pair for every single word, so the highlight moves the way the speaker actually talks.
We shipped this alongside AI voiceover in July 2026 - this guide goes deep on the captioning half.
What's inside a highlight-clip template?
Here's the finished demo this tutorial builds - a 20-second vertical clip (720×1280, 600 frames at 30 fps) with 14 overlays:
A quick word on the footage. Our stand-in "podcast" is Tears of Steel - the Blender Foundation's open movie, licensed CC BY 3.0. Credit: (CC) Blender Foundation | mango.blender.org. We picked it deliberately: because it's openly licensed, you can follow this tutorial with the exact same file we used, hosted here - https://renderly-video.s3.ap-east-1.amazonaws.com/downloads/tears-of-steel-first-6min-cc-by-blender.mp4 (6 minutes 16 seconds).
Three pieces of the template do the work:
main_clip- a video overlay playing the highlight. ItsvideoStartTimeis235, which means: start 235 seconds (3:55) into the source file. At 270 frames long, it plays source seconds 235–244. This trim is the only place the clip window is defined.subtitles- a caption overlay withisDynamic: trueand an emptycaptionsarray. It's the template variable. Until a render fills it, there are no captions.- The caption style - a word-highlight design (the template uses our "hustle" preset: bold white text, accent-colored active word) built visually in the editor.
Notice what's not here: no styling parameters waiting in the API request. The caption look was designed once, in the editor, by someone looking at pixels. New to overlays and trims? The overlays guide covers the model in five minutes.
Step 1 - point transcribe at the clip
Here's the request. The inputProps are the composition JSON you already have - exported from the editor, or built by your pipeline - trimmed here to the two overlays that matter:
POST https://renderly.video/api/v1/renders
Authorization: Bearer rnd_...

{
  "inputProps": {
    "width": 720, "height": 1280, "fps": 30, "durationInFrames": 600,
    "overlays": [
      {
        "name": "main_clip",
        "type": "video",
        "src": "https://renderly-video.s3.ap-east-1.amazonaws.com/downloads/tears-of-steel-first-6min-cc-by-blender.mp4",
        "videoStartTime": 235,
        "durationInFrames": 270,
        "from": 150,
        ...
      },
      {
        "name": "subtitles",
        "type": "caption",
        "isDynamic": true,
        "captions": [],
        "template": "hustle",
        ...
      },
      ...12 more overlays: hook text, attribution card, outro, music...
    ]
  },
  "replacements": {
    "subtitles": {
      "transcribe": { "source": "main_clip" }
    }
  }
}Everything under inputProps is just the clip's composition - the same JSON whether captions exist or not. (Rendering from a saved project? Send "projectId" instead and skip the props entirely.) The only captioning-specific code in the whole request is the one replacement value at the bottom. It says: fill the subtitles variable by transcribing the audio of the overlay named main_clip.
What happens next, in plain English: the engine reads main_clip's trim - starts at second 235, plays for 9 seconds - and transcribes only that window of the source audio. The word timings come back clip-relative, meaning 0 is the moment your clip starts, not the moment the file starts. Then the captions land on the subtitles overlay, styled by the template, aligned with the clip as it plays.
The response is a render job - {"jobId": "...", "status": "PENDING"}. Poll GET /api/v1/renders/:jobId, or skip polling and register a webhook to get a render.completed event with the output URL.
Now tally what you didn't do. You didn't cut a 9-second file with ffmpeg. You didn't generate an SRT. You didn't offset a single timestamp. And you didn't send one byte of styling JSON.
Step 2 - what does "word-synced" actually mean?
Here's the verified output from our demo window (source seconds 235–244, the film's mid-shoot pep talk): "You love her. She's your passion. Be tender to her. Be honest." - word for word what's spoken, transcribed through music and room noise, in 4 caption groups with 12 individually timed words.
The detail worth checking in your own render: the first word starts at 435 milliseconds - not at 235 seconds. That's clip-relative timing working.
It sounds obvious until you've built the naive version: transcribe the whole file, subtract the clip offset, and watch it drift the moment anyone changes the overlay's speed or nudges the trim. We learned that the annoying way, which is why the engine returns timings already aligned to the clip - speed changes and the overlay's own start frame included.
Two practical notes. Accuracy is strong on clear speech, but it's still speech recognition - always eyeball a render before it ships to a client. And if your episodes aren't in English, pass a language hint inside transcribe to skip auto-detection.
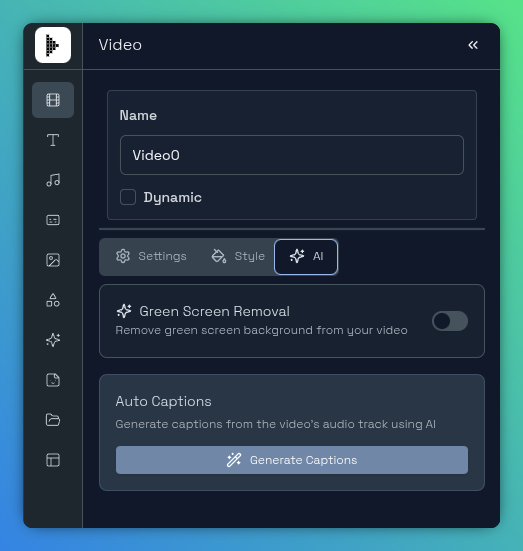
Prefer clicking to curling? The editor does the same thing: select the video you want captioned, switch to the AI tab, and hit Generate Captions - a dialog shows the credit cost before anything runs. Same engine, same clip window, nice for teammates who'll never touch the API.
Why do you only pay for the clip?
Because billing follows the transcription window, and the window follows your trim. Our source file runs 6:16 - transcribing it end to end is 7 started minutes at 0.25 credits each, or 1.75 credits. The 9-second window bills as one started minute: 0.25 credits. Same file, same captions on screen, 7× cheaper - and our render receipt from July 2026 shows exactly that: creditsUsed: 0.25.
Competitors don't really engage with this. Caption docs from Creatomate, JSON2Video, and Shotstack discuss styling parameters at length and trims not at all: you transcribe the file you send. For clip workflows, the file is never the thing you want captioned.
At pipeline volume, the difference compounds:
| Clips per month | Clip-window billing | Whole-file billing |
|---|---|---|
| 25 | 6.25 credits | 43.75 credits |
| 100 | 25 credits | 175 credits |
| 250 | 62.5 credits | 437.5 credits |
The window doesn't have to come from the trim, either. Pass explicit bounds inside the value - {"transcribe": {"source": "main_clip", "startTime": 235, "endTime": 244}} - when you want to override it. And the guarantees from the launch apply here: charged only on success, automatic refunds on failure, and retries never double-charge.
Can you caption a clip without rendering a video?
Yes - the same engine is exposed directly as POST /api/v1/ai/captions, for when there's no render in the picture: feeding captions to another tool, pre-checking a transcript before you pick the clip, or captioning inside a pipeline that isn't Renderly's.
POST https://renderly.video/api/v1/ai/captions
Authorization: Bearer rnd_...

{
  "url": "https://renderly-video.s3.ap-east-1.amazonaws.com/downloads/tears-of-steel-first-6min-cc-by-blender.mp4",
  "startTime": 235,
  "endTime": 244
}The response is the actual transcript data - here's ours, trimmed:
{
  "status": "COMPLETED",
  "creditsUsed": 0.25,
  "captions": [
    {
      "text": "You love her.",
      "startMs": 435,
      "endMs": 1240,
      "words": [
        { "word": "You",  "startMs": 435,  "endMs": 531 },
        { "word": "love", "startMs": 531,  "endMs": 966 },
        { "word": "her.", "startMs": 1063, "endMs": 1240 }
      ]
    },
    ...3 more caption groups...
  ],
  "captionOverlay": { "type": "caption", "captions": [...], ... }
}Two things to notice. captions[] is yours to take anywhere - every word timed, clip-relative. And captionOverlay is a paste-able overlay JSON, ready to drop into a project's overlays array if you come back to Renderly for the render. Limits are generous: public URL ingestion (your file is never proxied), up to 5 GB and 3 hours of audio.
Scale it: a clip pipeline without an editor
The one-line replacement is the same on clip one and clip one thousand - which is the point. A per-episode loop looks like this: pick the highlight timestamps (your producer's notes, a chapter list, or an LLM over the transcript), set videoStartTime and duration per render - or pass explicit startTime/endTime - and send the identical transcribe replacement every time. Renders land in your storage via webhooks, captioned and styled, no timeline open anywhere.
For the orchestration shell around that loop, our n8n workflow guide and Make.com guide both apply - captioning adds one value to the render node you'd already have. It also works conversationally through the MCP connector, where renderly_generate_captions is a tool your AI assistant can call.
Wrap-up
The whole tutorial compresses to one sentence: to auto-caption a podcast clip via API, mark a caption overlay as a variable, trim the clip you want, and send {"transcribe": {"source": "main_clip"}} - word-synced captions in your template's own style, billed for the window you actually used. Our receipt: 9 seconds of a 6:16 file, 12 timed words, 0.25 credits.
New accounts come with free starter credits, so the demo above costs nothing to reproduce - the AI features guide has the full parameter reference, and the API docs cover the endpoints under the "AI" tag. If you wire captions into a clip pipeline, we'd love to see what it makes - support@renderly.video.
Demo footage: Tears of Steel - (CC) Blender Foundation | mango.blender.org, used under CC BY 3.0.
Frequently asked
How much does it cost to auto-caption a podcast clip?
Do I have to transcribe the whole file to caption a clip?
Can the captions highlight word by word?
What file sizes and lengths are supported?
What happens if the transcription fails?
Related Articles
Renderly Ships AI Voiceover and Auto-Captions
Renderly now turns a script into a narrated, word-synced-captioned video in one API call. AI voiceover (12 curated voices, 992-voice catalogue) + auto-captions, flat credit pricing.
July 19, 2026
How to Set Up Video Rendering Webhooks (Production Guide)
Video rendering is asynchronous — polling wastes 90%+ of requests. This guide covers HMAC SHA-256 signature verification, retry semantics, idempotency, and the raw-body pitfall that breaks most webhook handlers.
May 28, 2026
How to Build Automated Video Workflows with n8n (Step-by-Step Guide)
n8n hit 183k+ GitHub stars and 230k+ active users in 2026 — the fastest-growing workflow automation platform. This guide walks through building a video automation workflow with n8n + Renderly's API in under 45 minutes.
May 25, 2026
How to Create Videos with Claude Using Renderly's MCP Connector
Renderly is an MCP connector for Claude. Connect it and render personalized videos by typing a sentence. Setup steps, all ten tools, and current limits.
June 4, 2026